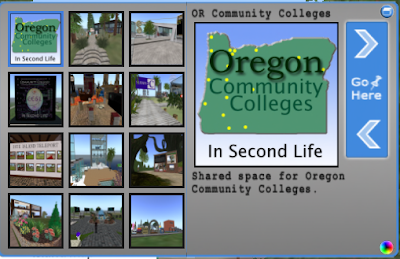
You can easily create a tour of places in Second Life to share! The first step is to come by Oregon Community Colleges island and pick up a free copy of the open source Tour HUD* that was made for GSD&M by Digi Vox of the Electric Sheep company. You can get one here:
http://tinysl.com/S78b424
To use the HUD as a tour guide, you find it in your inventory and right click on it and select "wear", and the tour HUD will show up like in your Second Life viewer window like the graphic above. Then, to visit the places in the Tour, you just click on the image of where you would like to go, and a brief description of where that image links to is displayed. When you click the "go here" button, you are teleported to that place in Second Life.
To create your own tour with this HUD, you will need 1) a title for the tour stop location, 2) an image to represent the tour stop 3) a landmark for where you would like the tour stop to ultimately take you when you click "Go Here." Edit it by dragging it out onto the ground rather than wearing it, and right click on it and select "Edit". Rename it something that makes sense to you first, then, go to the content tab and right click the note titled "Locations- Fill this out to change the tour!".
When you open the Locations note, it is fully documented, and very easy to update- all you have to do is replace the information that is in the card for your 12 locations. Step by step:
1.You make a descriptive title up for each place, and put it where the notecard says Title:
2. You list the name of its corresponding landmark, which you collected in Second Life from any point by using the "Create Landmark Here" from the World Menu where the notecard says LANDMARK: !!Important note!! The title for your landmark must exactly match from the notecard to the actual landmark. You will delete the current landmarks in the Tour HUD, and drag your landmarks into it instead. Its easiest to get the title exactly the same if you find the landmark in your inventory and copy the name by right clicking and selecting copy, and then using ctrl +v to paste.
3.you replace the UUID number for the picture You find this by right clicking on the corresponding image in your inventory and select "Copy Asset UUID, then paste it by pressing ctrl+v in the script where it says Picture:
4. You create a brief description (180 characters or less) and place it in the Locations notecard where it says DESCRIPTION: for each of your 12 locations.
!!Important!! Try changing the information for a single location in the Tour HUD and test it before going any further to make sure you understand how to update it.
You just do this four step process for all 12 places in your tour, and then you can hand copies of it out to your students, colleagues, friends- Have fun exploring and sharing! If you would like additional help for any part of this process, check out our island schedule for an open sandbox drop in time.
*A HUD is a heads up display, or a small piece of software that extends the things that your Second Life program can do.
No comments:
Post a Comment